Showing posts with label How To. Show all posts

Tuesday, July 29, 2014

Plug Into Better Shipping Part 11: Pick, Pack and Label


In our last blog entry we took a look at getting your orders out the door. This week, to truly cap off that final stage of the fulfilment process, we’re going to pay closer attention to picking, packing and labelling. By using Temando, you are able to streamline this entire process by generating pick slips, booking shipments and printing consignment labels directly from the backend of your Magento store. Temando is also able to assist in provisioning partial shipments and distributing tracking emails to your customer. Here’s a rundown on just how easy it is to pick, pack and label your orders.

This blog will be broken up into 3 parts:
  • Printing your pick slips
  • Packing and labelling
  • Advanced Pick/Packing

Printing pick slips:

Once an order has been placed by a customer it will appear in the ‘Manage Shipments’ menu located within the Temando tab on your Magento dashboard. Clicking on an individual order from this list will present the order details. Clicking ‘Pick Slip’ in the top right corner will download the pick slip for the order.


The pick slip gives details for the order such as the order number, delivery details and most importantly, the SKUs and quantity of SKUs required to fill the order.

Packing and Labelling:

Now that the order has been picked and packed into its packaging (Satchel, Box, etc.) all that is left to do is book and label the shipment. To book, simply scroll down to the bottom of the order summary page. Here will be a list of available quotes with the Cheapest and Fastest options indicated. Simply click ‘Book Quote’ to confirm the booking.


Now in the top right, a button to ‘View Consignment’ will be available. Click the button to download a pdf file with the consignment label. Simply print this off, attach it to the package and it’s ready to go.


Advanced Process:

In addition to the above processes, Temando’s Business extension for Magento removes the need to pick, pack, book and label orders individually by enabling you to print multiple pick slips at once. To do this, simply navigate to the ‘Manage Shipments’ grid and check the shipments you wish to print pick slips for. Next, click the drop-down on the right hand side and click ‘Retrieve Pick Slip’.


This will generate a single PDF document with pick slips for all of the selected orders. Then, when you’ve packed the orders you can book shipments and print consignment labels from the same dropdown menu. Once they’re labelled it’s just a matter of waiting for collection!


This edition of our Plug into better shipping blog series has hopefully demonstrated the benefits that Temando provides with regards to pick, pack and labelling. By generating pick slips and booking shipments directly from the Manage Shipments grid of your Magento dashboard, Temando removes manual entry and guesswork from the fulfilment equation. This reduces the chance for human error and can provide significant time savings to your operation.


To find out more about picking and fulfilling multiple orders with our Business extension, get in touch with our Solutions team.

Wednesday, June 25, 2014

Plug into Better Shipping Part 10: Getting Orders Out The Door


In previous blogs we’ve spoken about optimising your rules and preferences for delivery. Now that the back end has been customised, it’s time to go through what happens when customers order from you and what you need to know to get those products out the door and into your customers’ hands.

A consistent approach to fulfilment and implementing a streamlined process will ensure that you’re meeting your customers’ expectations the majority of the time. By maintaining a quick turnaround time for order fulfilment, you can ensure that you are meeting delivery deadlines and giving your customers a positive buying experience. The average delivery time for online orders in Australia is 2.8 days and understanding how to process your orders in the back end of Magento is key to ensuring you can match or better that.

Benefits:

  • Temando allows you to Book shipments, print consignment details and push tracking details to the customer
  • Full access to change order details and select different quotes
  • As there is no manual entry required to fulfil your orders, the chance of human error is minimised
  • The ability to batch process multiple orders at once


How to Process Single Bookings:
Once you’ve logged into your Magento Dashboard, navigate to the Temando tab and select ‘Manage Shipments:


Next you’ll see a list of orders that have been placed. To ship an order, simply click ‘view’ on the relevant row:


Now you’ll be presented with the order details of that specific order. Here, you are able to make any changes to the order that may be required. At the bottom of the page, the quotes generated for the order will be visible, with the fastest and cheapest options indicated in the ‘notes’ column:


Click ‘Make Booking’ next to the quote that best suits your requirements to confirm the booking. Now at the top of the page you will see confirmation that the shipment has been booked:


The orange button at the top of the order details will now read ‘View Consignment’ which you can click to download the consignment note and shipment label to print and attach to the package.


How to Process Multiple Orders:
If you are on a Temando Magento Extension Business plan you have the added ability to process multiple orders at once. In order to do so, follow the same process as above to navigate to the Manage Shipments page. When you’ve reached the page, you will be able to select your pending orders and using the dropdown menu on the right hand side of the screen, select ‘Book Shipments’:


Once you have booked the relevant orders, click ‘Retrieve Consignment Label’ to download a pdf document with the labels for all selected orders.
Now all you need to do is pack and label your packages and await pickup.


Temando in Magento also offers a range of fulfilment options for business that have larger order volumes or more specific fulfilment needs such as:

  • Alternate routing options by fulfiling from multiple warehouses
  • Manifesting for businesses that have permanent pickups in place
  • The ability to fulfil your orders from ERP and warehouse management systems 

Minimising the time from when a customer places an order through to its fulfilment is vital to surprising and delighting your customers. By providing one place to book shipments, print labels and push tracking information to your customer, Temando lets you streamline your process and get your customer their product as soon as possible.


Next week’s blog will be in a similar vein to this one, we’ll be having a look at the specifics of picking, packing and labelling your orders ready for collection. 

Wednesday, June 18, 2014

Plug Into Better Shipping Part 9: Click & Collect Configuration


Continuing on from our last post, Click & Collect which walked through the Click & Collect experience for the user, this week we show you how to configure and manage your Magento admin to offer Click & Collect on the front end. There are 3 parts to this post:

1. How to configure the basics

2. How to set up locations and zones

3. Store user experience


How do you configure the basics of Click & Collect in your Magento admin? 

1. Select Click & Collect settings from the Temando Click & Collect tab in the top nav

Select Click & Collect Settings

2. In the general information tab you will need to configure the following:
Sections to configure in the Click & Collect module

Rate Configuration: If you would like to add a price to the Click & Collect option. This value will be displayed to the customer. 
Options: Enabling 'Show Estimate Shipping on Product Page' will include Click & Collect as a delivery option among the other options you have enabled.
Store Map: Enable the store map to appear for customer selection. You can edit details such as the size, icon and name in this section.

Example of store map that is displayed to the customer when Store Map is enabled


Checkout Calender: Allows customers to select a day they would like to collect the item.
Email Template:  Customise emails to be sent to customers. We recommend the following:
  • Ready for Pickup Template used to send “Awaiting Collection” email to customers. 
  • Reminder Template used to send reminders to customers about available pickup
  • Admin Template used to send an email to the store notifying them that they have an order to be fulfilled and collected by a customer. 
Send admin email on invoice creation: The order to collect email will be sent to the store when the invoice is created. 

*You can upload the email templates in the system section of your admin, learn more. 

How do you set up locations?
Sections to configure when setting up locations

1. Select Manage Stores from the Temando Click & Collect tab in the top nav
2. Select Add New Store
3. Enter general information

Display location hours: Enable this if you would like store hours to be visible to your customers. Setting the store hours comes later in the configuration
Location note: Allows a message about the store location to be displayed to the customer.

4. Enter the new stores address and contact details
5. Zones: select the zones this store services. You can select multiple zones by using CTRL and clicking
6. Location hours: select ‘add hours’ to add a day (under name) and start and end times. Ensure you select ‘save' when your done
7. User Permissions: select which users you would like to access this locations orders. Do this by checking the radio button and clicking ‘save’

How do you set up Zones?
Zones are postcodes within a country that are supported by a Click & Collect option. Each Store needs to have at least one Zone assigned to it. 

The zone/s assigned to a store dictates the map zoom on the front-end. E.g. If postcode range 2000:2999 is supported by a store the map will zoom out to view the image of New South Wales.
We talked in depth about setting up locations and zones in our previous post here.

You need to use the same configuration method as discussed in our part 8 blog post. But this time the zones need to be created in the Click & Collect section of the Magento Admin. 

What does it look like for the store? 

1. If enabled – the store will get an email notifying that an item has been purchased from their store
2. Log into Magento admin and head to the ‘manage collections’ under Temando Click & Collect tab
3. Any pending collections will be listed with a pending status, click on the order to view the details of the order and to access the pick slip.

List of pending and collected orders

4. When the items are ready for the customer to collect select ‘ready to collect’ this will prompt a notification email
5. Need to send a reminder to the customer to collect their parcel? Go back into the order and click send email reminder
6. Once the customer has collected their parcel make sure you enter the order number and confirm collection in the backend to keep records up to date. This will change the pickup state to order collected and the process is complete.

Click & Collect is an easy and effective delivery option that your customers will appreciate being offered. 

If you would like to offer Click & Collect in your Magento store contact our team. 


Friday, June 13, 2014

Plug Into Better Shipping Part 8: Click & Collect


The digital and physical worlds have collided. Consumers expect a consistent experience across multiple touch points. Friction, real or perceived, must be removed to increase conversions and provide a customer experience with a point of difference.


Many bricks and mortar retailers are including physical store fulfilment models, this is evident in the Australian retail landscape, simply type in 'Click and Collect' into your search engine and pages will appear of retailers who have adopted this fulfilment model.

For many SME merchants this seemingly enterprise grade functionality is only available for the top end of town. Think again. Click & Collect can easily be enabled when 2 store locations are available in your Magento platform. 


BCF offer Pickup in Store


DS Click & Collect promotional page


Benefits
- No delivery costs for your business. The ability to charge what ever amount to your customer.
- Incremental conversion attribution. 
- Increased in-store foot traffic and opportunities for customer engagement.
- Multiple store capability allows the customer to select the pick-up store most convenient to them. 

What does the customer journey look like?


Points to consider 
1. Staffing – who will manage Click & Collect in-store? Nominate an eCommerce champion to look after the process flow
2. Dedicate a computer and work station for Click & Collect orders
3. If your store is smaller, notifications can be sent by email advising in-store staff that Click & Collect has been selected as a delivery option. This allows you to prioritise fulfilment ASAP.

Remember, you can easily offer these options, but you need to make sure you have the processes and technology in place to provide a seamless customer experience. Ensure you have the Click & Collect journey down pat (dry run through recommended) – so when your customer gets to your store they've had a 'surprise and delight' experience. Who knows, maybe they'll purchase that shirt they were collecting in black as well. 


Next week we will show you how to configure Click & Collect in your admin.

Want to learn more about any of the features we talk about? Contact one of our Solution Managers or visit www.temando.com.

Wednesday, June 4, 2014

Plug Into Better Shipping Part 7: Adding Value for the Social Conscious


Giving your customer options isn't just about delivery, you can also add value to your customers purchase through options such as carbon offset or micro donations. This has been an online norm for a few years now with booking platforms such as Jetstar and Virgin Australia giving customers the opportunity to carbon offset their flights as well as donating to suggested charity programs.
Jetstars checkout give the option to offset and donate.


When using the Temando Shipping Extension in Magento you have the ability to offer your customers the option to carbon offset or make a micro donations at the checkout. Providing these alternative options not only helps with your corporate responsibility positioning, it also allows the social conscious customer to contribute to positive social change. Whilst the options may not directly impact your conversions it's a welcome addition to your brand image and all offsets are measured.

In a recent public opinion poll conducted by the Lowy Institute 45% of Australian respondents now see global warming as a ‘serious and pressing problem’. Temando in co-operation with the Gaia Partnership can easily enable carbon offsets in your Magento store. The Gaia Partnership measures and offsets the carbon from the courier delivery through programs such as Tasmanian Native Forest Protection Project.


Anaconda is a great eCommerce example of a business dedicated to corporate responsibility. Anaconda have configured their Magento store to display carbon offset as optional at the checkout.

Anaconda have Carbon Offset enabled at the checkout.


How to enable carbon offset
1. In your Magento admin panel go to Temando > Configuration Settings > Temando
2. From the carbon offset section you have 3 options to select from:
        Disabled – this option will turn off the carbon offset and is unavailable to customers
        Optional – a check box is displayed to the customer and they can choose to opt in
        Mandatory – carbon offset is added to all orders
3. Once you have selected from the drop down menu click ‘save config’


Along with carbon offsetting, you can also enable micro donations to a charity. Through the Temando Shipping Extension for Magento you can offer a micro donation to the Footprints Network. The Footprints Network funds projects such as Keeping girls in school Uganda, Kids clean water project Mpofini village and other worthy projects.


How to enable Footprints
1. Once in your Magento admin panel go to Temando > Configuration Settings > Temando
2. From the Footprints section you have 3 options to select from:
        Disabled – this option will turn off the carbon offset and is unavailable to customers
        Optional – a check box is displayed to the customer and they can choose to opt in
        Mandatory – carbon offset is added to all orders
3. Once you have selected from the drop down menu click ‘save config’


If you have selected optional or mandatory it will appear in your checkout in the shipping section.


Enabling these options at the checkout is a great value add for your social conscious customer. 


Wednesday, May 28, 2014

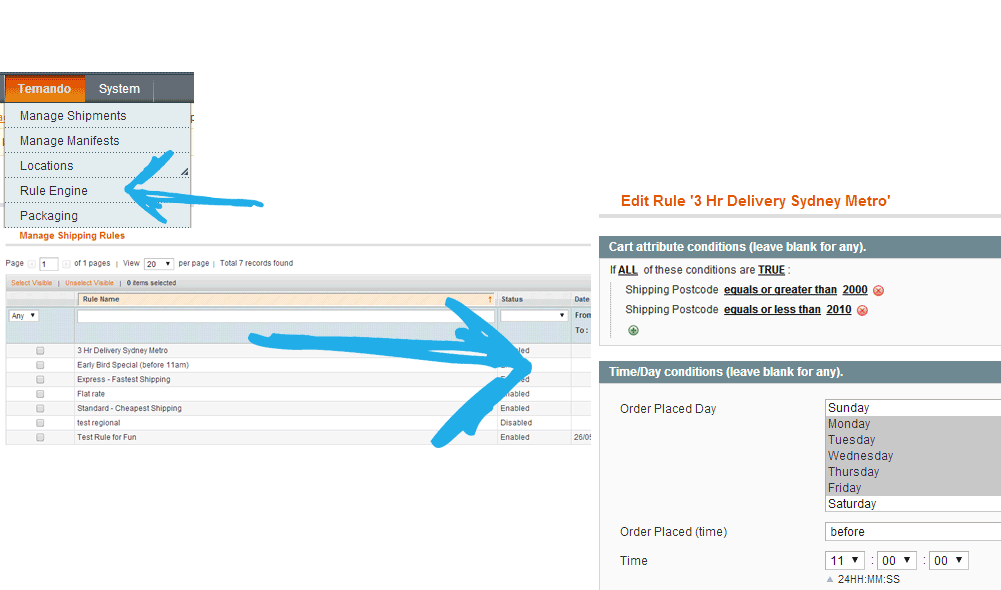
Plug Into Better Shipping Part 6: Rules Part 2- Getting Tricky


Last week we covered creating simple & effective shipping rules in Magento. We talked about why you need shipping rules, outlined a few basic rules and how to configure them in your Temando Shipping Extension for Magento.


The advanced rules engine is only available in professional plans and upwards, if you would like to upgrade, you can contact Team Temando.


To start let’s take a look at an example where shipping can fall down if rules are not used


Scenario
A home wares website offers free shipping as their latest campaign. They promote it via EDM and to their social networks. All items are included from sofas, lamps to decorative pillows and at a glance the post campaign evaluation data indicated that the campaign was not profitable. However upon closer inspection this was due to larger, bulky items being purchased as a part of the campaign. These Items included products with dimensions of 140x45x70cm, which are more costly to ship and therefore, reduced the average margin across the campaign.


Recommendations
An advanced rules engine like the one found in the Temando's Magento Shipping Extension allows you to exclude certain SKU’s from campaigns. In this example we would recommend that a little * is included advising customers certain large and bulky items will be excluded from the promotion. When configured in Magento, the rules engine will automatically exclude nominate SKU’s or categories from the campaign and will quote a nominated or dynamic shipping cost to the customer.


Results
A successful free shipping campaign!


What advanced rules can you create?


Time specific rules 
Want to replicate The ICONIC’s very popular 3hr service? Time specific rules allow you to do so.

Time specific rules allow you to offer specific delivery timings. For example, 3hr or Same day, it also allows you to apply conditions to specific products or product categories.


Pamper Hamper use a time specific rule to offer same day shipping to Melbourne Metro Postcodes


Flat rate shipping for specific zones 

Offer certain zones a flat rate price. This allows you to create a rule where all Sydney metro post codes will be marked as a nominated amount for example $9.99. 


Free shipping over a certain amount 
A step further to the basic free shipping rules is over a certain amount. You can allocate a cart value, once the customer reaches that cart value they will receive free shipping
Hunters and Gatherers offer free shipping to customers who spend over $149.95


Controlling what carriers service what areas 

You can control what carriers deliver to each zone. By setting up zones and defining IF THIS THEN THAT conditions, you can specify which courier company delivers to a certain zone. For example, if you have superstar feedback about Fastway Melbourne drivers you can specify in your rules engine that all Melbourne post codes are fulfilled by Fastway only. You could then specify rural Victorian postcodes to be fulfilled by TNT and so on.  


Where do I set up and manage my shipping rules? 


Handy Tip
Unlike the starter version, the higher plans allow you to label each delivery option instead of the Temando nominated names. For example instead of 'Couriers Please 1-5days $8.75' you can name the option 'Standard Delivery' A handy option to make your check out sleek and seamless. 

If you're interested in having a closer look at the rules engine and Temando's shipping extension - head to our Magento Demo Store. Or for detailed step-by-step instruction on setting up advanced rules in your Temando Magento Extension. Please refer to the Magento configuration guide.

Next week we will discuss adding extras at the checkout - especially for those social conscious customers.


Wednesday, May 21, 2014

Plug Into Better Shipping Part 5: Rules Part 1- Creating Simple & Effective Shipping Rules


Whilst not everyone thinks shipping is cool, here at Temando we’re all about it. Providing your customers with the right delivery option at the right time can dramatically affect your conversion rates and even reduce your costs in the long run.

Why do you need rules? Shipping rules allow you to provide different shipping options and prices to your end customer. You can also apply different variables to the rule like product sku, postcode, time and demographics to control your shipping. Shipping rules enable you to execute your shipping strategy – so they’re pretty important to get right.


There are two levels of rules in the Temando Shipping Extension. Firstly, in the Starter module, you can enable basic pre-set rules. All other versions give you access to the advanced rules engine, where you can start to offer free shipping over a certain cart value or on certain SKU’s, as well as other rules. It gives you the ability to conduct shipping campaigns as well as takes into account heavier or larger SKU’s to ensure you don’t lose out.


This post covers the basic rules you can offer in all 4 plans.


Please note that the below 4 rules are the only rules available in the Starter plan. These rules can only be enabled and disabled, unlike the higher plans which allow you to create rules with IF THIS THEN THAT conditions and create rules on a more granular level.


Free Shipping - no charge to customer.

Free Shipping
boohoo.com offer free shipping on all products

What: 
When this rule is enabled free shipping is displayed to all customers across all products


Why: 
If your shipping cost is built into your product margin or your strategy is to offer free shipping to stand out in a crowded market place.


Handy Tip:
#1 No dimensions are required on the product sku to quote the customer, however, dimensions are needed for Temando to quote the shipment. If you’re sending the same size packages, use the default settings we talked about in our earlier packaging blog article.


#2 If you have large bulky items we recommend not enabling free shipping. When free shipping is offered in a scenario where sending a kayak to Alice Springs is required, it can get pricey.

Fixed Price / Flat Rate - customer pays the same set amount.

Flat Rate Shipping
featherandbuzz.com offer their customers a flat rate shipping price

What: 

When this rule is enabled the customer will pay a specified fixed price across all products. This can only be one nominated value in the starter plan.

Handy Tip:
#1 It is important not to give the impression that your shipping is expensive. Make shipping costs comparable to the cost of goods sold. A customer purchasing $5 napkins might not want to pay $9.95 for shipping on top of that.

Dynamic Pricing – Display all carriers or the cheapest or fastest or cheapest and fastest.
All:

All Shipping Quotes
Supercheap Auto empowers their customer through choice, displaying all quotes

What: 

This option will display all possible quotes from carriers that have been selected in the "allowed carriers" configuration setting. The customer then selects from the list of displayed quotes.


Why: 
This empowers the customer to select their preferred carrier and delivery time.


Handy Tip:
#1 You don’t have to have all carriers displaying, you can select only 1 i.e. Fastway, this will result in all relevant Fastway quotes being displayed to the customer.

Cheapest: Only the cheapest quote is shown.
What: 

Only the cheapest option for the delivery will be displayed.

Why: 

This will ensure your shipping costs are always competitive – relative to the postcode and dimensions of your shipment.

Handy Tip:
#1 Cheapest will often coincide with the slower services and are also referred to as standard shipping. Often the cheapest is a road service.

Fastest: Only the fastest quote is shown.
What: 

Only the fastest delivery option will be displayed to the customer

Why: 

Let your customer decide how urgent a purchase is. If they want it fast, make sure they can select an express option.

Handy Tip:
#1 Fastest is also referred to as Express shipping. This service will generally be 1-2days from metro to metro.

Cheapest and Fastest: The customer can choose between the cheapest or the fastest quote.
What: 

A combination of cheapest and fastest.


Why: 
Allows your customer more choice.


Handy Tip:
#1 On all dynamic options you can add a mark-up to the displayed price by either a fixed or percentage amount. This will help you turn shipping from a cost center into a profit center.

Next week we take a deeper look into creating shipping rules in the advanced rules engine. We also look at some of the cool campaigns you can create using shipping rules.


Wednesday, May 14, 2014

Plug Into Better Shipping Part 4: Managing Multiple Locations in Magento


Do you have more than one warehouse or physical store? Are you shipping from all of these locations? Well, you should be! Temando helps online retailers big and small manage multiple locations and streamline their entire fulfilment processes.


Multi locations functionality is the ability to set up more than one sending location in your Magento store admin, whether this is from a warehouse, physical store location or a supplier. This gives you the ability to use your physical stores as fulfilment points, allowing you to send from different locations Australia wide.


Let’s walk through the below example: If your customer is in country Queensland, fulfilling the order from your closest fulfilment point with inventory helps to decrease travel time, as well as the cost, compared to sending the item from a Sydney warehouse. You can now speed up delivery times and avoid unnecessary freight costs.

Multiple locations and zones


It gets better – once you have your locations set up in your Magento store, you can also create some really smart rules. *We will look into creating shipping rules in our next 2 posts.  Multi location functionality is available in the Temando Magento Shipping Extension for plans professional, business and enterprise solutions. Business and Enterprise gives you the extra flexibility of adding sub accounts to each of the locations.

What’s a sub account and why would I need that? 
Sub accounts allow Temando to identify separate physical locations and bill accordingly. Some retailers prefer this to be transparent and separated-in a franchisee model for example. If you would like each location to be billed individually, but still have visibility over costs, this feature is perfect for you.


Setting up multiple locations 
There are 2 components of multiple locations that go hand in hand we call them zones and warehouses (don’t let the term warehouses confuse you, warehouses can be any fulfillment point i.e your store. We also refer to these warehouses as multi-location).

A zone is an area within a country which any given warehouse delivers to, it’s specified by postal code ranges.

Setting up a zone
1. Select Temando tool bar > Locations > Manage Zones from this admin panel select Add New Zone
2. Name: this is an internal reference 
3. Country: the country the zone is being created in
4. Postal Code Ranges


  • To cover the whole country enter: 1:9999
  • You can individually enter the postcodes separated by a coma
  • To define a range use a colon like the example below
Colon used to separate ranges when defining postal code ranges

5. Don’t forget to confirm by selecting save

For a PDF list of Post Codes from April 2014 download this document. You can view the most up to date post codes here.

Creating a warehouse
1. Select from the Temando Tool Bar Locations > Manage Warehouses > Add New Warehouse
2. General Information


  • Status: is important to ensure is switched to enabled if you would like the warehouse to be considered as an option
  • Location Type: If you are sending from this address continually we recommend always selecting Business (opposed to residential
  • Priority: If you have 2 warehouses that service the same zone, this priority allows you to select which warehouse will be chosen. The priorities for warehouses are sequential and start at “0” (eg: “0” will take priority of “1”, “1” will take priority over “2” and so on)
  • Stores allows you to select what Magento stores you would like this warehouse associated with

3. Address & Contact panel (immediately below General Information). The information required is:

Address Details
Street: Number and street address
City: Suburb. This needs to be specific to the postcode. For example if the postcode is 2011 – it has to be Woolloomooloo, it cannot be the default of Sydney.
Country
Region: State

Contact Details
Contact Name: Primary contact at this warehouse
Contact email: Primary Contact email address
Phone 1
Phone 2: Not mandatory but good to list.
Fax: Not mandatory but good to list

4. Assign your warehouse zones by selecting a zone, to select multiple zones hold CTRL and click
Assigning warehouses

5. Select yes or no for Extra Location Information items
6. Temando Profile is only applicable to users with sub-accounts with Temando
7. Assign pre-created Magento users the ability to view assigned warehouse/locations.


  • This is key when defining what login can see what orders. i.e. Queensland store when assigned here cannot see Victoria stores orders. 

Make sure you save your settings!

Setting up zones and warehouses is the base for rules in the Temando Shipping Extension for Magento. It is important to define your shipping strategy and create zones and warehouses to align with this strategy.

Coming soon

Our team is working hard on adding features to the Enterprise plan, multi-location inventory management being one. This will give you the ability to assign stock/SKUS to each location.
Stay tuned for that future feature release!

Next week we will start looking at setting basic rules in Magento.